Sunday, January 5, 2014

DIY-Canning Ring Pumpkin

Canning Ring Pumpkin 
  • With most of the canning done, and extra canning rings lying around, I thought I would make a canning ring pumpkin for the table. It’s cute, festive, and takes about 2 minutes—my kind of craft.
    Canning Ring Pumpkin
    You’ll need:
    • Canning rings {all the same size}
    • String {to tie the rings together}
    • 3 or 4 cinnamon sticks
    • Some scrap fabric or paper cut into the shape of leaves {enough for 2 leaves}
    Directions:
    String the canning rings together in a straight line.  Once all the rings are on, tie them together tightly, pulling them into a round pumpkin shape.  Then, stick the cinnamon sticks down into the pumpkin and add the leaves.

    Home Made Italian Seasoning Recipe

    Easy Kitchen Tips – Italian Seasoning Recipe

    Ingredients
    3 tablespoons dried parsley
    3 tablespoons dried basil
    2 1/2 tablespoons dried oregano
    1 teaspoon dried thyme
    1 tablespoon garlic powder
    1 teaspoon onion powder
    1 teaspoon dried rosemary
    1/2 teaspoon red pepper flakes
    1/4 teaspoon black pepper
    Directions
    Mix all the spices together in a small bowl, then give them a whirl in your food processor*, or spice grinder* then store in an airtight container.

    Orange Peel Sugar Scrub

    Orange Peel Sugar Scrub


    Here is a recipe for a deliciously sweet sugar scrub!

    With winter in full swing, my skin gets dry and flaky. I'm horrible about not using lotion, because I'm usually grabbing Gray out of the tub too, getting her dressed, and chasing her around. Lotion, is not exactly on my mind.

    So I turn to scrubs to keep my skin soft, flake free, and in this case smelling delicious!


    Materials:
    Glass container for storage
    3/4 cup granulated sugar
    4Tbs Almond Oil
    1Tbs Olive Oil
    Zest of 1 Orange


    Start by zesting your orange. Make sure you use a microplane or something similar because you want very tiny pieces. Watch Those Fingers!!


    Zest likes to hide on the back of the grater, so make sure you scrape all of that goodness off.


    Add your sugar and zest to your glass container. Mix it well, muddling it some to help release the oils of the orange


    Add your oils a little at a time, stirring them in with the sugar mixture.


    Finish the container off with a label if it's a gift, or a decorative bow and enjoy!
    Kiss your winter skin ~GoodBye~


    *Just a tip- I try not to use a scrub more than twice a week. Your skin needs time to recover after a good exfoliation*

    source:http://gritsandgiggles.blogspot.com/2012/01/tutorial-orange-peel-sugar-scrub.html

    Healthy Homemade Fruit Snacks

    Healthy Homemade Fruit Snacks

    Why are these healthy fruit snacks?

    I’m glad you asked! Not only are these healthy fruit snacks made from whole fruit, but they also use grass-fed gelatin. This stuff is full of beneficial things like collagen (essential for  strong nails, hair, and beautiful skin). It’s also a great source of high quality protein and amino acids.
    Sweetened only with a little bit of honey, and colored by the fruit themselves, these snacks are simple, delicious, and very kid (and crazy mom) friendly. Blueberry is my favorite (which is saying something because it’s my least favorite berry of the bunch). Combined with the lemon juice… oh boy. They are good. Yes, these yummy treats are a truly healthy fruit snack.
    Homemade healthy fruit snacks! No food dyes, no refined sugars, only good stuff!

    Soap Snowmen

    January Family Crafts – DIY Soap Snowman

    Soap Snowman Craft
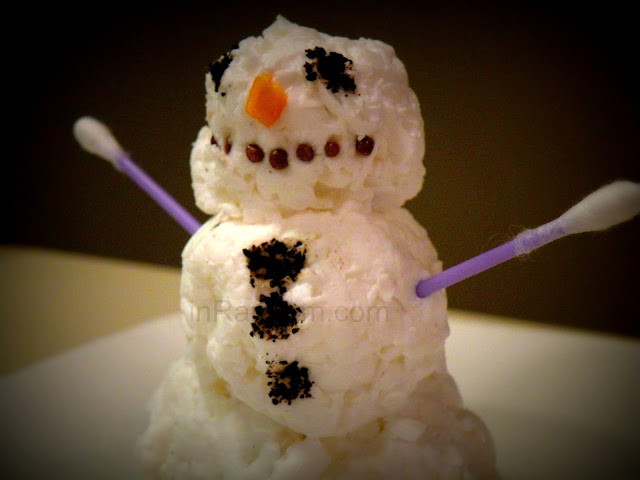
    Today my tot and I were coming up with lots of fun family crafts we could do together with a Winter seasonal theme! Here is our first, The Soap Snowman! He is very simple to make and it is a really great sensory craft.
    What You Need: 
    • 1 Bar Ivory Soap
    • Cheese Grater
    • 1/4 Cup of Water
    What you use to decorate the snowman is up to you. We chose to decorate the snowman’s eyes and buttons with coffee grounds because coffee is actually very good for your skin! So is chocolate, which is why his mouth is made from little tiny chocolate beads. The Q-Tips are my son’s idea because we always clean our ears after bathtime (clever!). The nose is the only piece that doesn’t go with the bathtime scheme as it is a corner of a Cheezit my son was eating. There aren’t many things in our bathroom that are orange!
    Tools for Soap Snowmen Craft
    How to Make the Snowman:
    1. Grate the Ivory bar soap into a bowl.
    2. Using a fork, slowly stir in the water while keeping the consistency. You want to try and keep the curls.
    3. Shape the softened soap into balls, large / med / small, like a Snowman.
    4. Using fun things around your home, decorate your snowman!
    grated soap curls
    The craft is wonderful in January when it is too cold to go outside and if you don’t have any snow, it’s fun to make your own! It is also a very ‘clean’ craft. Once you are finished, your kids can wash their hands or take the snowman into the tub for more fun! The perfect idea if you have kids that don’t like taking baths.
    Soapman

    Saturday, June 29, 2013

    Homemade Fourth of July Soap Recipe

    DIY Fourth of July Craft Project – Homemade Red, White and Blue Soap


    DIY Homemade Soap for the Fourth of July - Red White and Blue Melt and Pour Glycerin Soap RecipeCelebrate the Fourth of July with this fun diy soap project that the whole family can get involved in! This heart shaped red, white and blue soap shows off your love for your America’s freedom and democracy through its shape and color! I used the same heart shaped silicone soap mold as I’ve used for other projects such as my Handmade Solid Lotion Bars, Triple Butter Solid Sugar Scrub Hearts,Handmilled Heart Shaped Soaps and Handmilled Lavender & Dead Sea Salt Soaps. However, if you don’t have a heart shaped mold, you can use any mold you happen to have though the amounts of soap needed for each layer may be different. In addition you’ll also need a digital kitchen scale, a cutting board, a knife, a utensil to stir with and a glass Pyrex measuring cup or equivalent.

    Fourth of July DIY Project - Homemade Red, White and Blue Glycerin Soap Recipe

    Homemade Fourth of July Soap Recipe

    © Rebecca’s Soap Delicatessen

    Ingredients:

    6.5 oz. opaque melt and pour glycerin soap base
    Red and blue food color, liquid soap dye or powder pigments
    .2 oz. fragrance oil of choice or .1 oz. essential oil (optional)

    Instructions:

    This recipe yields two heart shaped soaps. However, if you wish to make more you can increase the recipe easily by doubling or tripling it. Start by cutting 3 oz. (by weight) of your melt and pour soap base into chunks and placing them into your glass measuring cup. Then melt the soap chunks at reduced power in the microwave. Watch it closely as you do not want it to boil! Remove as soon as it has melted. Stir in several drops of food color or pigment and 1/3 of your fragrance (which is .2 oz. total by weight.) Don’t use too much colorant – a little goes a long way! – or you could end up with soap crayons instead of bath soap.
    Now place your soap mold onto a cutting board or other transportable flat surface, then pour the red tinted soap into two of the heart shaped molds so that the soap is distributed evenly between the two hearts. Transport the mold via the cutting board to the freezer and allow to cool and harden completely.
    While your layer of red soap is solidifying, wash and dry your measuring cup. Then weigh out 1.5 oz. of your soap base, cut into chunks, and place into the measuring cup. Melt in the microwave, add a bit of fragrance, and mix well. Remove your mold from the freezer and pour the white soap base evenly across your two heart molds on top of the solidified red base.
    Place in the freezer to harden and repeat the steps for the final blue layer, using 2 oz. of soap base, your blue soap dye and your remaining fragrance. Once your blue layer has hardened on top of the red and white layers, your soap is ready to unmold. Then simply wrap your soaps in plastic cling film and label if desired.  Otherwise this patriotic homemade soap is ready for your soap dish!
    source:http://soapdelinews.com/2013/06/homemade-soap-recipe-fourth-of-july-diy.html

    DYI-MEMORIAL DAY STARS AND STRIPES WREATH


    MEMORIAL DAY STARS AND STRIPES WREATH

    Wave the flag and bring out the red, white, and blue with this patriotic wreath. Simply place mini flag toothpicks (about three packages of 100 flags) into a styrofoam wreath (we used a 10″ styrofoam disk and cutout a 7″ circle out, because some wreaths are extruded and are hard for the toothpicks to push through) until the wreath is completely full and there is no white showing. Then your wreath is ready to hang; greeting every guest that arrives!