
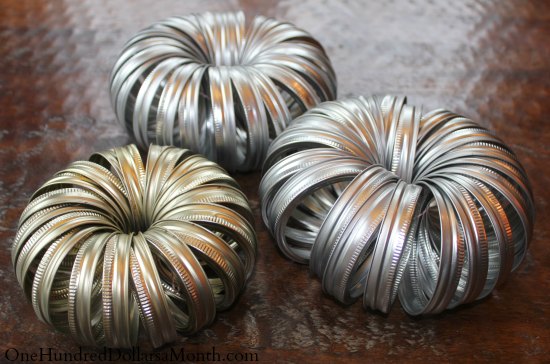
Canning Ring Pumpkin
With most of the canning done, and extra canning rings lying around, I thought I would make a canning ring pumpkin for the table. It’s cute, festive, and takes about 2 minutes—my kind of craft.
You’ll need:
- Canning rings {all the same size}
- String {to tie the rings together}
- 3 or 4 cinnamon sticks
- Some scrap fabric or paper cut into the shape of leaves {enough for 2 leaves}
Directions:
String the canning rings together in a straight line. Once all the rings are on, tie them together tightly, pulling them into a round pumpkin shape. Then, stick the cinnamon sticks down into the pumpkin and add the leaves.

MEMORIAL DAY STARS AND STRIPES WREATH
Wave the flag and bring out the red, white, and blue with this patriotic wreath. Simply place mini flag toothpicks (about three packages of 100 flags) into a styrofoam wreath (we used a 10″ styrofoam disk and cutout a 7″ circle out, because some wreaths are extruded and are hard for the toothpicks to push through) until the wreath is completely full and there is no white showing. Then your wreath is ready to hang; greeting every guest that arrives!
Wave the flag and bring out the red, white, and blue with this patriotic wreath. Simply place mini flag toothpicks (about three packages of 100 flags) into a styrofoam wreath (we used a 10″ styrofoam disk and cutout a 7″ circle out, because some wreaths are extruded and are hard for the toothpicks to push through) until the wreath is completely full and there is no white showing. Then your wreath is ready to hang; greeting every guest that arrives!
Homemade Eye Makeup Remover
Makes about 1/3 cup
Ingredients
2 Tbsp witch hazel
2 Tbsp oil of choice
2 Tbsp water (please use filtered water. I use Reverse Osmosis.)
Directions
1. Add all ingredients to your container / dispenser (I used an old jojoba oil container.)
2. Shake well before using.
3. Wipe on eyes with clean fingers, or moisten cotton ball or makeup pad and swipe over eyes.
TIPS:
To clean up stray makeup on face, put a small amount on fingers or dip cotton swab in mixture and clean up stray marks.
When washing face, make sure to get some cleaner on your eye area if you wish to remove any remaining oily residue.
UPDATE: A reader mentioned in the comments that when you add water to something you increase the chance of it spoiling. I answered saying I have seen natural cosmetics with water in them, and they have a shelf life of 6 months. I also think the witch hazel will deal with some of this, but just make sure – if it seems bad—common sense – don’t wipe it on your eyes  .
.
source:http://wholenewmom.com/whole-new-budget/best-homemade-eye-makeup-remover/
2 Tbsp oil of choice
2 Tbsp water (please use filtered water. I use Reverse Osmosis.)
Use Bookends as Floating Bookshelves
-An Amazingly great idea

Source: pinterest.com
Talk about DIY..This a great idea...
DIY Backyard Ice Rink

If you have the room, why not?
How to Build a Backyard Ice Rink
1) Location. You’re yard might seem flat, but you would be surprised. Put 4 stakes in the ground for where you envision your rink will be and rink string across diagonally making sure to keep it level. Now measure how high the string is off the ground from one end to the other. If its 5″ on one end and 8″ on the other you have a 3″ drop. Considering you will need at least a 2 inch ice base that means your water level will be 5″ at the deepest end. This is important for determine what size lumber to buy. If you have a very large drop from one end to the other you can either build a super structure or start getting fill. I have done both and getting the fill is the easiest in the long run.
2) Lumber. The construction is actually very simple. I settled on a 16 x 24 sized rink which is two 8 foot boards on one side and 3 on the other. No cutting involved. I had been using 2×8 boards, but am considering going with 2x10 to allow me a deeper ice base and let me cover more ground for a larger rink. 16×24 for fine for little kids, but as they get bigger they will want a larger rink. Make sure you get pressure treated wood and buy a couple extra boards.
3) Hardware. Buy a box of 2 1/2″ prime guard decking screws. The new pressure treated wood will eat threw the old galvanized screws very quickly. The prime guarded ones have a coating to protect the metal. They cost more, but you can use them for several years.
4) Liner. There are 2 ways to do a cheap liner. The first is to buy a large sheet of vapor barrier. Lowe's sells a 20′ x 100′ roll which I used for my rink. This stuff works great, but is hard to use for more than 1 season. The roll is long though so I used half one year and the other half the second year. Last season I bought a large tarp which is much thinker material. It seems to have held up fine and will try using it again this year.
5) Assemble. I cut the extra boards into 12″ pieces. These are used on the outside of the rink to attach the boards together and to reinforce the corners. For my 2×3 setup I needed 1 piece on each end and 2 on each side for a total of 6. Add in 4 for each corner and that's 10 pieces. Lay your boards out on flat surface, put a 12″ inch piece over a seam and start drilling in screws. Make sure they bite into the boards, but don’t go all the way through. I used 8 screws on each seam. Once the sides are together, stand them up in place and overlap at the corners. Put a couple screws in to hold it up where they overlap and than add your corner piece on the side to give it some reinforcement. I’ll get better pictures of this when I put mine together.
If you have any gaps under your boards because of dips in the yard, rake up some leaves to stuff under them. If you leave these gaps as-is your liner might bulge through them as it freezes and tear. I used hay for this as well. Anything that the mower can simply eat up in the fall is easiest.
Once the boards are all up, lay your liner down. I have attached the liner to the boards 2 ways. With the ‘disposable’ liner I stapled it onto the outside of the boards. This works, but as the weight of the water pulls on the liner it will tear. You also have a mess of staples to pull out in the spring. With my tarp I simply wrapped it over the boards and tucked it back underneath. This worked great, but you need to make sure your tarp is big enough to handle it.
6) Fill It. You are now ready to fill it up. It is best to wait until you are getting some consistently cold temperatures, but this is often hard to predict. Last year we had a very mild winter so I had over 6 weeks with a pond instead of a rink. I fill it from my garden hose to a depth of 2 inches at the shallowest. When it freezes it will expand making it a little deeper.
7) Wait. It will take awhile to freeze all the way through so be patient. If you get on the ice too soon with will just break and freeze uneven. Try and fish out any leaves, branches, or critters that find their way into the water.
8) Prep it. Purchased a Rink Rake to smooth my ice, but you could easily build one. This is a simple device made of PVC pipe that distributes a thin layer of water onto your ice just like a zamboni. Do this a couple times to build up your ice a little more and make it really smooth.
That’s it! It does take a bit of work and practice, but the materials are really very cheap and most can be re-used for a long time. Here are some pictures of a DIY hockey rink .


http://www.myfamilylovesit.com
21 Clever Uses for Coffee Grounds
 Once that hot steaming mug of fresh coffee is poured, Most people don't give their coffee grounds a second thought. Check out these clever uses for coffee grounds
- Odor Elimination: Place the old grounds in a small can under the sink. Next time you chop an onion or fresh garlic, scoop out a smallamount of grounds, rub them thoroughly over your hands and rinse. Voila! No more Odor!
- Fertilizer: Coffee grounds are highly acidic, so spread them generously over the flower beds of acid loving plants for amazing blooms. Acid Loving plants include azaleas, rhododendrons, blueberries, Hydrangeas,lily of the valley, roses and creeping phlox.
- Make your own Gardeners Soap- melt a bar of glycerin soap and add 1/3 c. coffee grounds, reshape bar in a mold and use.
- Garbage Disposal Blade Sharpener: add 1 T. Grounds to running garbage disposal (with water running!) to sharpen the blades
- Ant Repellent- sprinkle old grounds around the perimeter of your home (outside) to deter ants.
- Dye- steep the grounds in boiling water to make your own dye for paper, fabric or easter eggs
- Garden- Cat Repellent- mix used grounds with chopped orange peels and sprinkle liberally around your garden and flowerbeds to keep your kitty from using your garden as her restroom.
- Double Your Harvest of Carrot & Radish- When planting, mix your carrot and radish seeds liberally with coffee grounds, plant as directed.
- Flea Dip: After bathing your pet (dog or cat) rub 1- 2 c. of coffee grounds into his fur,be sure to work them to the skin, rinse well. Not only does this kill fleas, but will make his fur silky smooth.
- Make homemade "Henna" Tattoos with dye from Coffee Grounds
- Cellulite Reducer- if you look at those high price cellulite creams, you'll see coffee is a main ingredient of many. Simply mix 1/4 c. warm coffee grounds (used) and 1 T. Olive oil. Apply liberally to problem areas, wrap with plastic wrap. Let set for 10 minutes, unwrap and shower normally.
- Grow Mushrooms
- Feed the worms- if you like fishing and have a wormbed at home, add coffee grounds, they love it! To make the BEST worm beds mix aged horse manure and coffee grounds, add worms. You'll grow some nice big fat ones for fishing!
- Highlight Hair Naturally- if you have auburn hair, you can rub coffee grounds through wet hair, leave for 3 minutes, rinse thoroughly. It will leave your hair soft, silky and with natural highlights.
- Pin Cushion Filler- Make your own pin cushions and use dried out used coffee grounds as a filler. It will keep the pins rust free!
- Deodorizer- place a small uncovered container of used grounds in the freezer to absorb odors naturally- also, this works great to get rid of a Mothball smell from closets or campers!
- Faux Parchment Paper- Crinkle up a piece of paper into a ball, unfold, place in a 9x13 pan of water with 1/2 c. used coffee grounds for 30 seconds, remove from liquid, gently blot excess coffee off, and allow to dry. This makes gorgeous labels for jars or apothecary bottles
- Repair Scratched Furniture- mix 1 T. coffee grounds with 1 Tsp olive oil. Apply with a cotton ball, wipe dry.
- Clean Fireplace- before removing ashes from your fireplace, sprinkle wet coffee grounds liberally over the ashes. Then scoop out the ashes & grounds together. This helps prevent the "dust" plume
- Abrasive Cleaner- when you need a quick abrasive cleaner mix equal parts of old coffee grounds and baking soda, scrub. (Be careful of using this on surfaces that are susceptible to stains!)
- Treasure Stones- make your own fun treasure stones
source: Budget101.com
DIY Glow Jars

These are the cutest idea. I had to share with everyone when I came across this.
They take about two minutes.. How’s that for an enticing DIY project?
These would look amazing at an evening outdoor wedding. Line walkways with them, or place them on tables.
DIY Glow Jars
For each glow jar you will need:
- a jar
- two Glow Sticks
- scissors
- rubber gloves
- safety glasses
Disclaimer: This is a project meant to be done by an adult – not a child!
Purchase Glow Sticks (I got a pack of 15 for $1.50) and dig a jar out of your cupboard.
http://www.intimateweddings.com

Grab two glow sticks and cut at one end. Make sure they are inside the jar when you cut them. I used rubber gloves because I didn’t want to get the glowing liquid on my hands.


Shake each glow stick while holding inside jar until contents are empty. You will notice little pieces of what looks like plastic along with the liquid. One reader said this is actually glass, so be careful. You will dump these out later.


Head to your garbage and dump out the little pieces of plastic. Swirl liquid around the jar.
 That’s it. You’re done! Go and find a dark place and enjoy the glow! (Note: These will glow for about an hour in warmish temps.)


How to replace your iPhone 4 screen - resources for doing it yourself

In this case it was definitely true. I fixed my completely broken iPhone front for around $35 total. It was either that or pay $550 for a new iPhone since I can't get a discount with my account renewal until February. I did it myself, with the help of You Tube and Amazon. And I'm here to tell you that if I can do it...you can do it too! Especially if you are like me and just need it to make it a few more months for a replacement.

I ordered THIS KIT from Amazon for about $25 and paid extra for it to come in 24 hours. I was mostly happy with the kit except that the Phillip's head screwdriver was a little too big and the new face didn't come with a speaker screen. If you keep those two things in mind, you can be prepared and just transfer the old speaker screen to the new.


Helpful hints:
--I would recommend taking a photo of each step for your own help in reassembly. I may or may not have ended up with a couple of extra parts.
--Have magnetic screwdrivers.
--Have a large flat workspace. In my case I used my cutting mat. It made keeping track of TEENY screws a lot easier and the bright background was helpful.
--Wait until your kids are not around.
--Breathe and have chocolate on hand.

There is also a small mark on my photos but I can totally work around it. Both things I can easily live with until February and a small price to pay to save $550.
My sound on/off button works better than before so at least there is that.
So if you find that your number is up...there is hope. Have a little confidence in your ability and jump in! Just be aware that this would probably void your warranty and you may be able to sweet talk an Apple nerd to fix it for you. If that fails, at least you know you have an option!
Also, I was in Best Buy within minutes of fixing it buying an Otterbox. :)
source:http://www.littlebitfunky.com
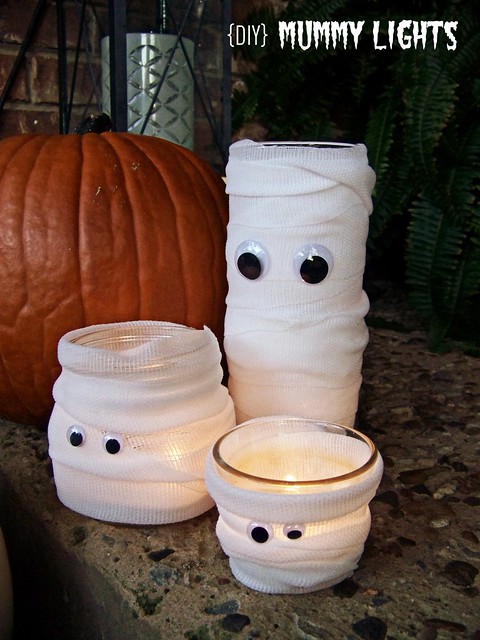
Mummy Lights
This project is exactly up my alley....cheap, easy and fast, with a big finish. In fact, it's so stupid-easy, that I'm almost embarrassed to show it to you. But I love them so much, so I hoped some of you would too.
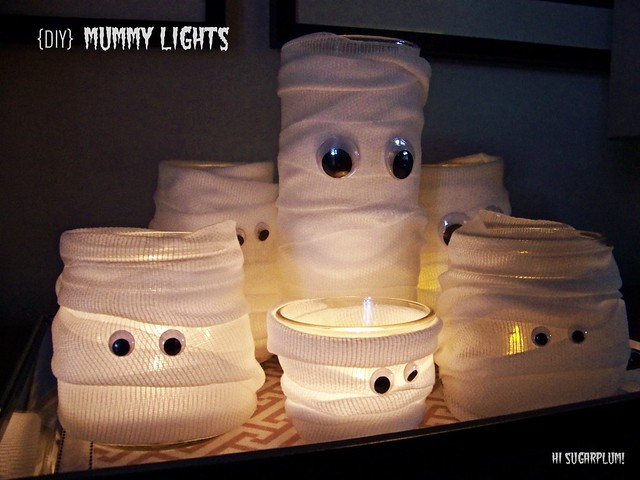
I spotted this pic on Pinterest as inspiration. It has no source though, so if these funny little lights are your genius, let me know!
All you need are some glass jars or vases, gauze and googly eyes. I used the mason jars from this tablescape, and found the rest of the supplies at the Dollar Store. Tape a gauze end to the top of the glass (I want to be able to reuse the glasses later), then wrap and twist as you wind your way down the jar. A dab of glue will hold the gauze in place and affix the googly eyes.
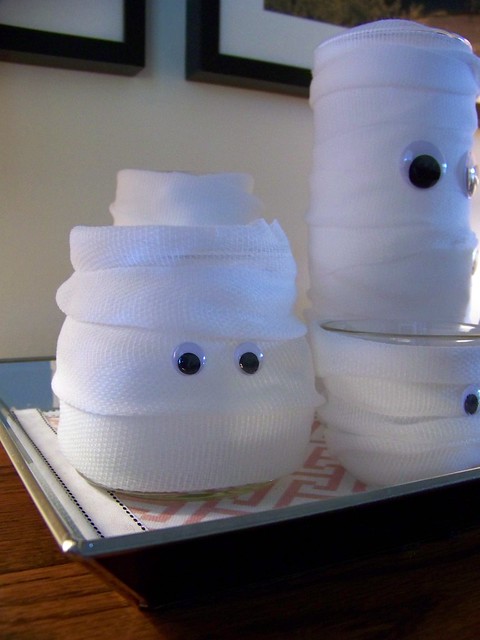
He was so cute, I rounded up more glass and made a Mummy Family.
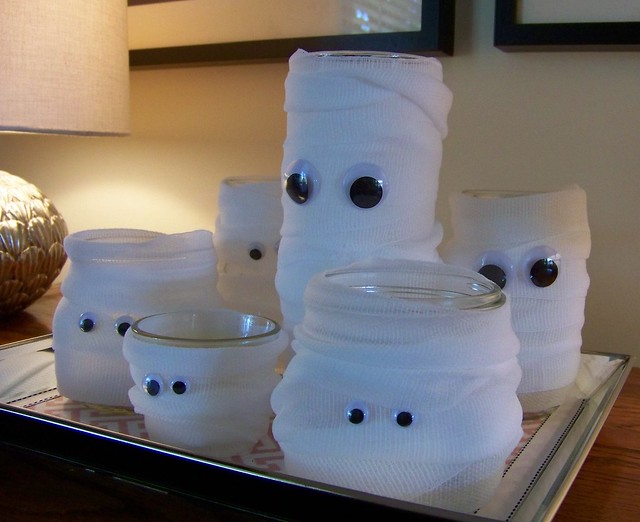
When darkness falls across the land, light tea candles in your mummies for a scary glow!
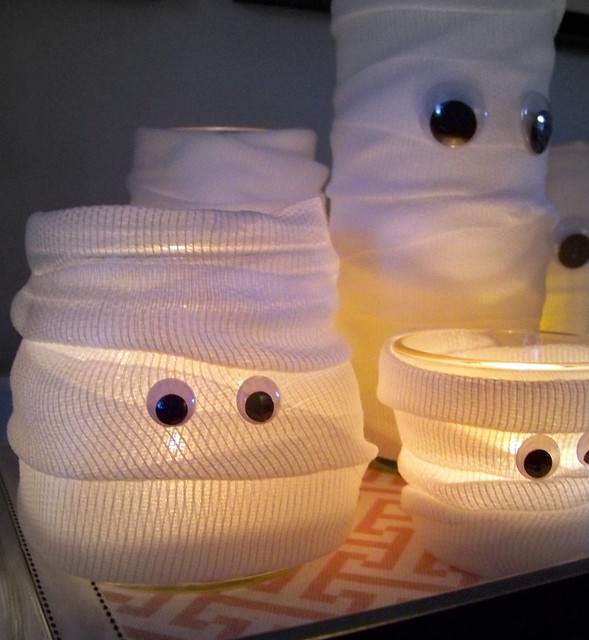
Okay, so they are way too cute to be spooky. These are hanging on my mantel (in progress).
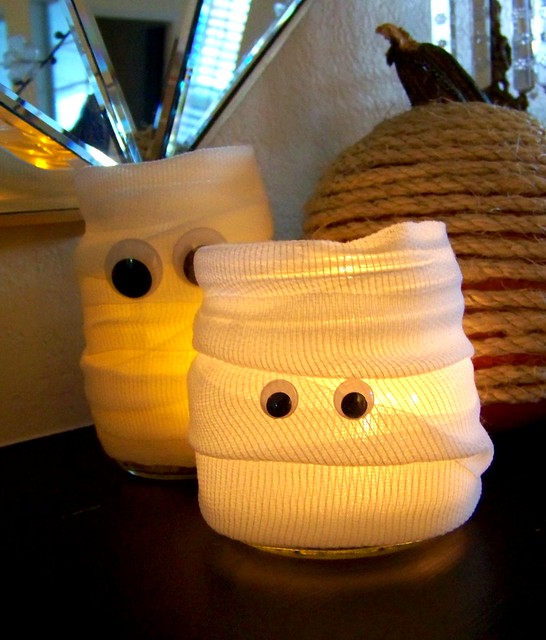
And a few more on the front porch (also in progress)!
This little project has sparked more Halloween ideas, so I'll get busy and show you as they finish. Do you do much decorating for Halloween?
source:http://hisugarplum.blogspot.com
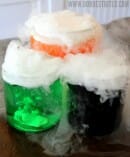
Mad Scientist Potion
Mad Scientist Potion
By Our Best Bites
By Our Best Bites
Large glass jars or beverage containers
Brightly colored drink of your choice
Dry Ice (1 pound per gallon of potion)
Heavy-duty gloves and/or an oven mitt and tongs
Brightly colored drink of your choice
Dry Ice (1 pound per gallon of potion)
Heavy-duty gloves and/or an oven mitt and tongs
Prepare drinks if necessary in the beverage jars. Otherwise, pour the drinks into the jars.
Carefully break up the dry ice with a mallet or a hammer. Add one piece (about 4-6 inchessomewhere on the piece) per gallon at a time to the drink containers and replenish the dry ice as necessary. Serve immediately, ladling the juice into cups and leaving the dry ice in the large containers.
Note: The 1 pound per gallon rule will give you about an hour’s worth of potion. If you need 2 hours, you’ll need 2 pounds per gallon, and on and on. :)
How to make Penny Coasters-Kids love it


Have a bunch of pennies lying around? MAKE COASTERS!!!!!!! Wooo. Not only will these coasters make you feel rich, all your friends will think your a millionaire.
What you need:
1. Hot Glue Gun & Sticks
2. Cork
3. X-acto
4. 41 PENNIES
First, cut your cork to fit a penny square of 5x5 pennys, 25 total.
Second, start to hot glue the pennies to the cork square.
Third, after you have finished gluing the first layer of pennies on, glue a penny square of 4x4 (16 pennies) in the middle of the 5x5 square.
Fourth, cut the visible cork from around the pennies so it looks nice and smooth.
Fifth, set coaster down, and put drink on coaster. TA-DAAA
Enjoy.
Add Cup Holders to your Resin Adirondack Chair

Several years ago, I saw resin adirandack chairs with integrated (molded) cup holders. When I went back to the store to buy them, they had stopped carrying them, and have not been able to find them since. You can purchase add-on cup holders, but at $25 + shipping, that's more than you'll pay for the entire chair!
Here's a super easy way of adding cup holders to your chairs, and may actually be free!
Materials needed:
Plastic container(s) from 16 ounce cake frosting (free if you're already making a cake)
Tools needed:
Marker, pencil, etc.
Drill
Jigsaw
File (optional)
Drill
Jigsaw
File (optional)


Place the plastic cup on the armrest. Be sure to center it left and right, as it will be a close fit.
Trace the bottom of the cup with a marker or pencil.
Trace the bottom of the cup with a marker or pencil.
source:http://www.techshop.ws
Homemade Glowing Paint
.jpg)
.jpg)
.jpg)
Now this stuff really glows!
.jpg)
Homemade Glow in the Dark Paint is super simple:
(A half used bottle is perfect)
+
(All you need is a yellow highlighter and water)
=
Glowing Paint!
.jpg)
.jpg)
Please note a black light IS required for this activity.
source:http://trainupachildlearnaswego.blogspot.com

Here’s a fun and easy way to make a traditional Halloween costume. Using a hoodie and some fabric, you and your child can make this costume and have a great time of trick-or-treating!
Pumpkin Costume
What you'll need:
- Orange fabric (1 yd x 54"w remnant)
- 1 heavy duty paper plate
- Black felt
- Hot glue gun, white glue
- 1/4 yard green fabric (we used linen)
- Wired raffia
- 4-6 plastic grocery bags
- Re-sealable plastic storage baggies & a straw or other light-weight filler
- Needle and thread
- 1 yard yarn, ribbon, or other cord
- Green knit cap
- Pattern
How to make it:
To make the pumpkin body:
1. Cut a hole in the paper plate large enough for your child's head to fit through. Test to be sure it fits.
 2. Take the orange fabric and make darts by hot gluing folds along the long edge of the fabric until you have gathered the fabric enough to fit around the head hole in the paper plate.

3. Hot glue the gathered fabric onto the plate; leave a little extra fabric to wrap down through the hole and glue to the other side of the plate so the edge won't scratch your child's neck.

4. Close up the back of the costume by hot gluing a seam down the back.

5. Have your child try on the costume so you can mark where the arm holes should be. Cut the arm holes and hot glue the fabric to the inside of the costume to keep the opening neat

6. Fold under the bottom edge of the fabric and stitch it in place, creating a 1" hem pocket. Leave a gap at the beginning and end of your stitch line. Ease cord, ribbon or yarn through the pocket of the hem. Once the costume is on your child, pull the ends of the cord to gather the fabric and tie it in a double bow knot. Excess cord can be tucked up into the inside of the gathered edge.

7. Cut eyes and mouth from black felt. Have your child put the costume on, so you can position the eyes and mouth before affixing them.

To make the leaf:
- Fold the green fabric in half. Lay the leaf pattern on the bias (at an angle across the grain) of the fabric. Pin the pattern in place and cut around it. Cut out four leaf patterns from the fabric. (See photo.)
- Lay wired raffia out along pattern to approximate the lengths required for the leaf veins. Twist them together to keep them in place and set aside. (See photo.)
- Apply white glue to one piece of fabric leaf and spread it evenly, covering the fabric completely. Lay the wired raffia on the glued fabric and cover with the second pattern piece. Press the fabric firmly around the raffia. Flip the leaf over and press from the other side. (See photos 1, 2.)
- When glue has dried completely, trim fabric edges if necessary and bend raffia to give leaf shape. Twist one end of a second piece of raffia tightly around the first. Wrap the loose end around a pill bottle or other round object to create a faux vine. (See photo.)
- Repeat steps 2-4 for the second leaf.
- Attach leaves to top of the costume with hot glue, positioning them near the neckline. (See photo.)
To fill in the pumpkin:
- Fill grocery bags evenly with inflated re-sealable baggies or other filler. Measure the length of your child's torso (the distance from their shoulder to their crotch.) Hot glue the handles of the grocery bags to the paper plate on the inside of the costume so they hang no lower than your child's torso measurement.
Tips:
- Dress your child in a green shirt and brown pants to wear under the costume.
- Add a cozy green knit cap to top off the costume and keep your little one warm.
source:http://crafts.kaboose.com
Pumpkin Party Cooler
You don't need a fairy godmother to turn a pumpkin into an ice bucket. Just choose a large, wide pumpkin, cut off the top third with a serrated knife or keyhole saw, and scrape out the pulp and seeds. Line the gourd with a glass or plastic bowl to prevent it from becoming water-logged. If the pumpkin opening is a bit too small for the bowl, carefully shave the inside edge with a spoon. Finish by filling the bowl with ice and bottled drinks.
Martha Stewart Living, Volume 143 October 2005
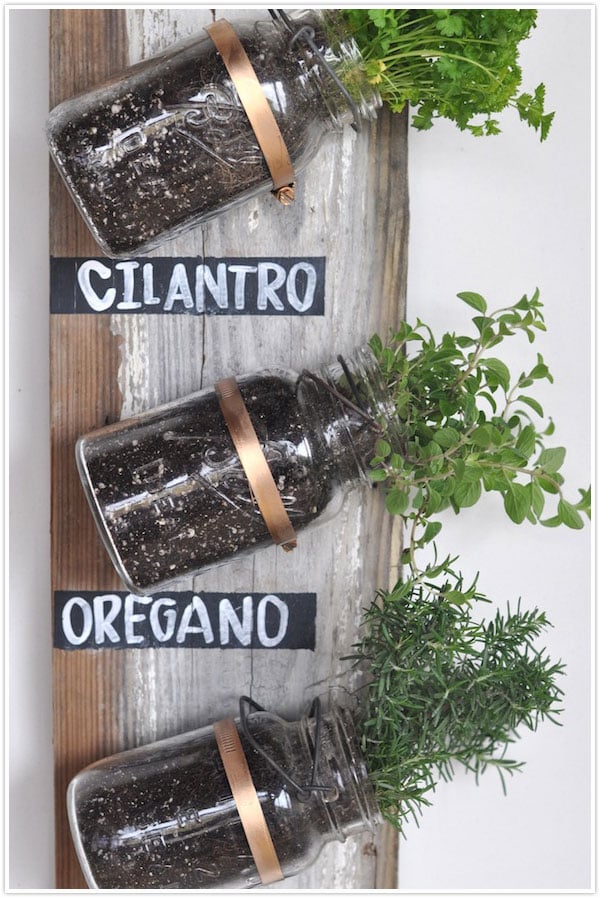
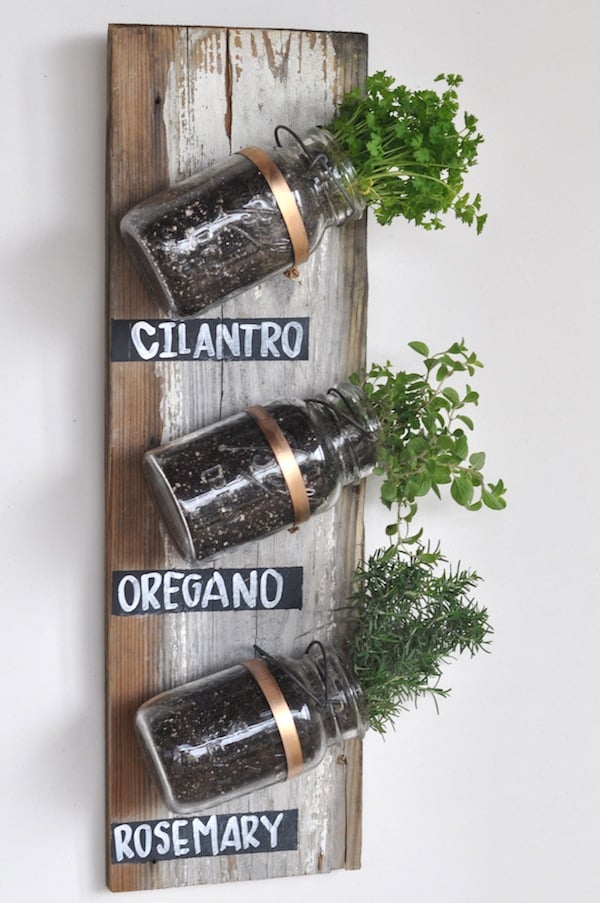
Mason Jar Herb garden
 Morning, everyone! Claire here, with a weekend project that’s perfect for all of you who are gearing up for lots of holiday cooking. Remember two weeks ago when I asked for your opinion on which hanging herb garden you liked best? Well, your votes weighed heavily in favor of option #1… so, using it as inspiration, I created my very own indoor herb display. So excited to share the final product…and to get cooking with my personal garden just in for guests to arrive! Want to make your own? We got the simple instructions after the jump…
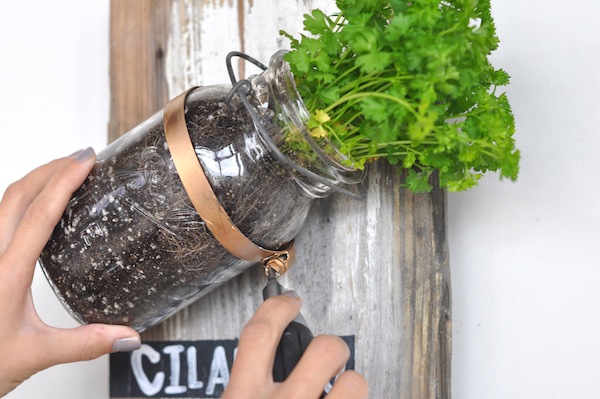
- old wooden board (I used a piece of painted wood I found by a torn down home)
- mason jars
- pipe clamps
- triangle ring hangers
- stainless hanging wire
- picture hanger
- chalkboard paint & chalk
- brush
- hammer, nails and screwdriver
- herbs
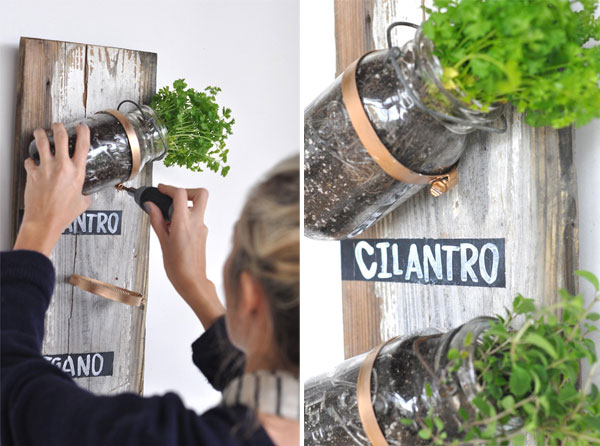
- Space mason jars evenly on wooden board, and mark placement with a pencil in order to design and measure around.
- Tape off rectangles on board, and paint with chalkboard paint as pictured above. This way, you can switch out herbs and change their labels accordingly.
- Paint pipe clamps gold, and secure to wooden board by hammering a nail through the small holes in the pipe clamp.
- On back of board, nail in ring hangers and tie on hanging wire.
- Plant herbs in mason jars.
- Place mason jars into pipe clamps and tighten with a screwdriver.
- Nail picture hanger into the wall, and hang your herb display!
source:http://camillestyles.com
Homemade Bottle Glow Stick-DIY

Summer Activity
1/4" Mt Dew in bottle, add tiny bit of baking soda and 3 capfuls of hydrogen peroxide.
Shake and it glows. Pour on sidewalk to "paint"...Who knew!? (The kids will have a blast!!)" doing this this summer
No comments:
Post a Comment