
Bombs Away Shot Glasses

Zoom To View Larger Image
|
Bombs away shot glasses are double walled bomb shaped shot glasses. Made of solid glass, these shot glasses are sure to make your next party a blow-out. From Fred and Friends.
The next time you plan to party make sure you’re well armed. Our Bombs Away shot glasses are guaranteed to make it a blow-out! They’re made from high-quality double-walled borosilicate glass with a frosted interior finish.
2 Shot Glasses per set. Solid Glass.
2 Shot Glasses per set. Solid Glass.
Decorating idea you will like.

Came across this during my search and wanted to share it with everyone..Great Idea
Camaro Police Cruiser:

The 2010 Chevy Camaro is likely to attract its fair share of police attention. But what if the new Camaro was the police car? Whoa. Rendered gallery below.
The detailed photoshop adds much of the features you'd expect from a police car, including the push-bar and an LED light-strip above the roof. Without many additions the Camaro looks the part of a macho patrol car and reminds us of the Z28 B4C. We also have to credit the creator with the corresponding white-and-blue lights worked into the headlights and alternative taillights, something we now badly want to see... just not in our rearview mirror.
Repairing a car console armrest


My wife an I recently purchased a "new" used car, and one of the defects was damaged upholstery on the armrest, which also serves as the lid for the compartment between the two fronts seats. This wasn't a deal breaker, but it was annoying enough that I set out to replace it.
What I quickly found was that it was near impossible to replace just this part, without replacing the entire console. I found replacement consoles online, and I even found one in a local salvage yard, but both options involved removing and replacing the entire console - way more time and money than I was willing to invest! And why scrap a perfectly good console when all I needed to replace was the armrest/lid upholstery?
So here is how I reupholstered a damaged armrest in under an an hour, for less than US$5!
(My car is 2007 PT Cruiser, but I imagine there are plenty of damaged armrests out there on different make/model cars, that can be restored in the same way;-)
Materials:
• A few feet of vinyl
• 3M Spray adhesive
• Packing foam
Tools:
* Torx bit & screwdriver
• Stapler
• Scissors
Step 1Remove armrest


This is pretty easy, as long as you have the correct tool. I believe I used a 10 or 15 torq bit to remove the three screws holding the armrest in place. Yours may be held in place with different screws, but still likely easy to remove.
Step 2Disassemble armrest


My armrest is made up of three layers of plastic parts; the part that screws into the base, the underside of the lid, which also include plastic tracks that allow the armrest to slide forward, and the top cover (with the damaged vinyl).
First remove the two screws that attach the base bracket to the underside of the lid, then remove the six screws that hold the remaining pieces together.
(One of the plastic tracks on my armrest was broken, likely from a previous owner who tried to pull the lid open without first pushing the release button. I glued this piece back in place during this process).
Step 3Remove vinyl

The vinyl cover is held in place with way too many staples. REmove these staples with a needle nose pliers or a small screwdriver.
Step 4Spray mount foam


To give the armrest a bit of cushioning, I used a bit of packing foam that came with some electronic component I bought ages ago.
Place the plastic lid on top of the foam, and then spray the lid with adhesive. i used 3M 90 HI-Strength spray adhesive, which did he job perfectly.
My foam wasn't quite large enough to cover the lid, so I mounted one piece, and then used a second to complete the job.
Once the top surface was covered, I sprayed a bit of adhesive on the underside, then folded the foam over the lid.
Step 5Cut vinyl


I decided to use a piece of vinyl that matched my car's interior, a light grey. But of course any material can be used; scrap leather denim, or your favorite old sweatshirt. But keep in mind that this piece will get a lot of wear, and vinyl is very easy to clean (and cheap! I paid about US$4 dollars for a half yard at a fabric store).
Step 6Staple vinyl


This I found to be the trickiest step in this process. The difficult part is getting the vinyl to wrap around the lid as tightly as possible. i chose not to glue it with spray mount, as this would make replacing it in the future more difficult.
The trick I used was to first staple the vinyl on the underside length wise, then widthwise, then I folded the corners in towards, creating as bit of overlap in the corners. You want to try and make the corners as tight as possible, to make the final product look close to factory original.
I chose to staple the vinyl, rather than using spray adhesive, to make it easier to replace the vinyl in the future shoul I need to.
Step 7Reassemble

Once your done stapling the vinyl inside the lid, now you're ready to reassemble the whole cover, reversing the steps you used to disassemble.


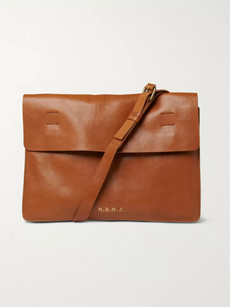
With multiple internal compartments and a soft construction, this Marc by Marc Jacobs' messenger bag is a compact and stylish way to carry all of your essentials around town. This satchel-like piece is crafted from dark brown leather for a collegiate feel. Remove the shoulder strap and use the back handle for a smarter appearance
SIZE & FIT
Spyderco Tenacious C122 Plain Folder Review
Posted in Folding Blade with tags Spyderco C122 Plain, Spyderco Knives,Spyderco Tenacious, Spyderco Tenacious Folder on November 7, 2008 by knifetalk The Spyderco Tenacious plain folder is fairly simple knife as far as looks go. However no time or effort has been spared in the manufacturing of this blade. The metal used in it construction is 8Cr13Mov stainless steel, one of the hardest metals spyderco offers. While i don’ t own this knife personally i would very much like to. I appreciate the simplicity offered in this daily personal carry. It has an adjustable pocket clip, and is easily opened with one hand. The edge is smooth and cuts incredibly well. I plan on getting aSpyderco Tenacious C122 Plain Folder of my own as soon as i get the funds.
source:knifetalk.wordpress.com
Spyderco Knives Delica 4 FRN C11BK Combo Folder Review
Posted in Folding Blade with tags Delica 4 FRN C11BK Combo, Delica 4 FRN Combo, Spyderco Delica 4 FRN Combo Folder, Spyderco Knives, Syderco Folding Knives on November 6, 2008 by knifetalk Spyderco is renown for their knife sharpeners, and now are renown for their knives as well. As far as quality Spyderco is right up their with Benchmade. This knife is a real nice personal carry; it comes with a multi-directional mounting clip allowing you to customize the position the knife sits on your hip, pocket, etc. The handle has the Spyderco spyder web traction, to ensure no slipping. The combo edge provides you with the best of both worlds in regards to blade edges. The Spyderco Delica 4 FRN C11BK Combo Folder is sure to have a great opening and closing action; and can easily be operated with one hand. Spyderco blades are designed to hold an edge for an extended period of time. Get your hands on a Delica 4 FRN Combo Folder today, i know i’m gunna.
source:knifetalk.wordpress.com
The FBI Just Created a National Anti-Laser Attack Task Force

Idiots shining laser pointers at pilots isn't exactly a new phenomenon, but it's not going away. In fact, it's getting a lot worse. Since 2005, "attack" frequency has risen 1,100 percent. That's a problem the new Laser Strike Working Group National Initiative aims to fix.
A Laser Strike Working Group has existed in the FBI's Sacramento division since 2008, and its success there is what prompted the FBI to take it national. Under a law passed this year, laser-wielders can get up to five years in prison and a fine of up to $11,000 for pointing the beams at planes. And that's actually a step down from existing law, which can dish out $250,000 fines and 20 year sentences for interfering with an aircraft in general.
"Use a laser pointer for what it's made for. Aiming a laser pointer at an aircraft is dangerous and reckless. Just don't do it," says George Johnson, a supervisory federal air marshal who is a liaison officer with the FBI. If you see a laser attack, the FBI suggests you call 911, email the Federal Aviation Administration, or get in touch with your local FBI field office. Be careful where you're pointing those things. [FBI News Blog]
No comments:
Post a Comment